

Converting a Citroen Relay (Ducato or Boxer) into a Motorhome – Fitting an Eberspacher diesel heater
Introduction – Central Heating
I researched in depth various systems for central heating the interior of my self build Motorhome. Whilst I had gas available in the form of an LPG cylinder, I decided that a diesel heater was the most appropriate system to heat the van simply due to its wide availability.
I considered the advantages and disadvantages of both air and water based central heating systems. Clearly a water based heating system has the main advantage of also supplying hot water for the shower. However, the increased power consumption would mean that I would be unable to run it for extended periods of time. In addition, the install time of air based systems is much shorter due to the decreased complexity. At this point, I took the decision to fit a dedicated hot water boiler at a later date and stick with hot air heating.
Choosing a Diesel Heater:
I reviewed the main contenders in Diesel air heaters including Eberspacher, Webasto and Planar. My research concluded that there was little difference between their specifications. I then began searching for second hand units as new models were out of my price range. Luckily, after a few weeks searching, I found a second hand Eberspacher Airtronic D2 2.2kw air heater within my price range. (The link shows the same model of heater that I purchased). The unit was in excellent condition. Furthermore, it included a new wiring harness, 7day timer, fuel line and fuel dosing pump. Upon receipt of the unit, I set it up in the garden and tested using a jerrycan of diesel. Thankfully it worked! I was a little surprised how noisy the exhaust was and so immediately purchased a silencer. I was careful to ensure that the model was stainless steel to minimise future maintenance.
Choosing a Diesel Heater – 2021 Update!
Since writing this article back in 2017, sites such as eBay and Amazon have started selling cheaper alternatives for diesel heaters. This has made them much more affordable and it is now possible to get a complete kit for around £120! These kits include all of the ducting, silencer, fuel tank, etc which make planning for the installation simple. I have installed a 5kw version in the boat and am happy to say that it works very well. Please see my video review of this product.
Stage 1 – Installing Eberspacher D2 diesel heater
Location
Upon installing the oven, I had previously decided that the gap below would be perfect for the Eberspacher D2 diesel heater. I placed the unit in position to enable me to mark out the holes for the air intake, exhaust and fuel feed. Below the floor there was a large box section which, since part of the chassis, could not be drilled. The box section limited my location choice to either the far back or far front of the space. I determined that to minimise disturbance to the airflow to the oven as well as maximising the use of space, I would mount the unit nearest the front of the cupboard.
Marking out & cutting ply
Next I removed the plate from the base of the heater and marked the position of the holes on the floor. It was important that the exhaust was unable to come into contact with the insulation board or ply. To prevent this occurring, I marked a cut out 100mm by 80mm that I would later line with aluminium. I used a 20mm flat drill to cut through the ply and foam. Next I stitch drilled between the holes to open it up. Finally I tidied the hole using a chisel.
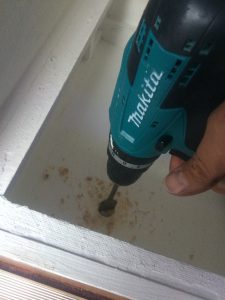
Drilling through steel
The next stage was to drill through the steel floor. I realigned the Eberspacher D2 diesel heater’s base plate and marked the accurate location of the fuel feed, exhaust and air hoses onto the steel. To create the hole, I used a long-reach 4mm drill bit and stitch drilled. A long reach drill was essential due to the thickness of the insulation and ply! I then cleaned the hole using a file. The insulation and ply was easy to cut using a pad saw and tidied using a sharp chisel. Finally I did not want any water, or worse diesel getting under the floor. To prevent this, I took the step of pumping a large amount of Sikaflex sealant around the perimeter of the hole and into any gaps in the insulation board.
Installing the Eberspacher D2 diesel heater heat shield
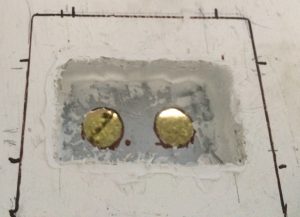
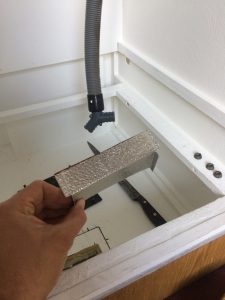
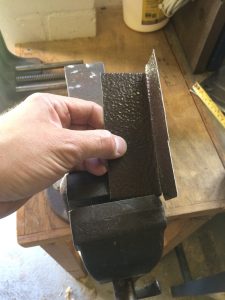
Now I had a neat hole through the floor, it was time to add a heat shield to protect the insulation board and ply from potential sources of ignition. Luckily, I had kept the aluminium heat shield from the old caravan. This proved to be perfect for this purpose. I simply marked out two pieces 110mm x 80mm for the sides and two pieces 90mm x 80mm for the ends. Next, I cut these to size using tin snips. In order to obtain the neat fold shown in the photo, I placed each piece in a vice and bent to shape by hand. The folds are to ensure that there is an overlap in the metal and that the box is therefore entirely sealed.
Finally I cleaned up the edges with a file and put another bead of sealant around the top of the hole. Next, I placed the four sides into place and secured them with 8 small countersunk screws.

Stage 2 – Eberspacher D2 Diesel heater fuel tank pickup
Now that the mounting hole was completed, I turned my attention to the fuel pick up line. I didn’t want to install the heater unit until I had tested it in situation and bled the fuel lines.
Time for a little research! My research showed that people had tried various methods for supplying fuel to the diesel heater. The simplest solution is to have a dedicated diesel tank for the Eberspacher D2 Diesel Heater . Indeed, there is the important advantage that in this case, red diesel can potentially be used for supplying the diesel heater.
Eberspacher genuine part
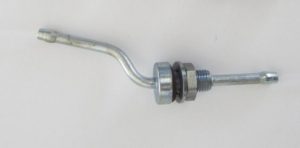
I opted for a permanent feed from the vehicles fuel tank. A number of different methods were reported online including drilling the tank. However, I was keen for this to be a tried and tested method and so purchased the (rather pricey) Eberspacher genuine part for the Relay, Ducato, Boxer as shown below. I knew fitting this was going to be a time consuming process and so allocated a day in order to do so.
Accessing fuel tank
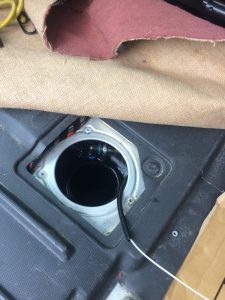
The first stage was to remove the double passenger seat and lift the carpet fitted earlier in the project. The removal of the passenger seat was simple and included loosening the two rear hex bolts and removing the front bolts completely. Once the carpet was lifted, I removed the vans plastic backed foam inspection cover. Finally I removed the fuel tank inspection cover itself. This was secured with three phillips head screws.

Removing fuel pump
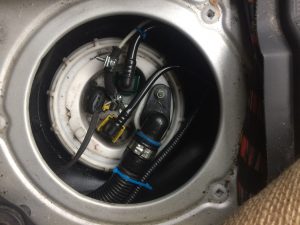
Once I had access to the tank, I needed to remove the fuel sender unit cover which was more tricky. The first stage was to disconnect the fuel feed, fuel return, breather pipe and electrics from the sender unit. These were all simple ‘squeeze’ type clips and took a few moments.
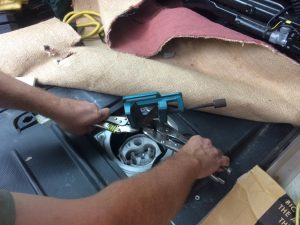
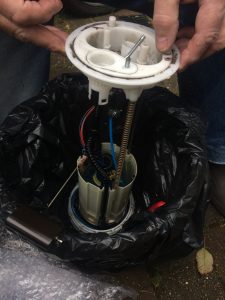
More difficult was the removal of the plastic locking ring holding the sender in place. Apparently there is a special tool for unscrewing this, however I did not own this tool…. But… with a little ingenuity (my dad must take the credit here) we managed to remove the locking ring using a homemade tool. Our tool consisted of two mole wrenches, a pair of tin snips and a vice…. (note the photographs are actually taken during the reassembly but is the same principle). Once the locking rink was loose, I simply lifted the entire sender unit out of the tank. I placed in a bucket lined with a bin liner to catch any diesel.
Fitting fuel pickup
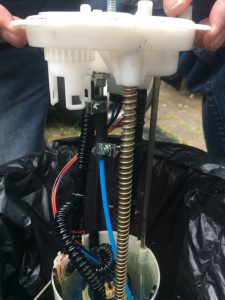
The next stage was to fit the fuel pickup pipe, this involved drilling an 8mm hole through the top of the unit as shown in the photograph. To ensure that swarf did not fall into the diesel remaining in the unit, I held a pot underneath whilst drilling the hole. Next I placed the fuel pickup into the hole and fitted the washer and nut below. The thin blue pipe was attached using a small section of fuel line and two jubilee clips. (These were all supplied as part of the kit)
Refitting fuel pump
After a quick check to ensure that no dirt had fallen into the unit, it was time to reinstall the pump. I returned it to the fuel tank and re-tightened the ring using my homemade tool. Next I reconnected the van’s fuel lines and electrical connections. At this point I started the engine to ensure that everything was correctly connected. I left the engine running for a few minutes to clear any air in the system.
Routing fuel line
Now that I had the connection to the tank, my next task was to run the fuel line to the Eberspacher D2 via its metering pump.
I found there to be a gap behind the fuel tank and was able to push the pipe through the gap and retrieve the other end by laying beneath the van. I had some spare black trunking and so slid this over the fuel line to protect it along its entire length. Finally I secured the hose in place using ‘P’ clips and stainless steel screws.
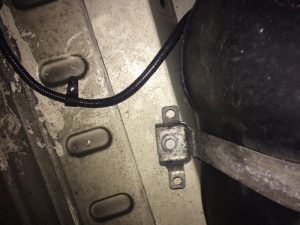
The Eberspacher instructions suggest the metering pump should be close to the diesel heater. After some investigation, I chose a location between two box sections where it would be protected. I wrapped the fuel pump in some old rubber inner tube in order to cut down on the vibration and secured it to the chasis ensuring that the outlet of the pump was angled uphill!
Connecting fuel line
The next stage was to connect the fuel line to the pickup using another short section of hose and two hose clamps. It is important to note that I left a loop of hose above the tank and secured using a number of cable ties in the event of me needing to relocate the fuel pump for any reason. These cable ties also prevent the hose from contacting the sharp metal edge of the floor.
I then repeated the procedure for connecting the fuel line from the metering pump to the Eberspacher D2 diesel heater itself. At this stage I did not connect the fuel line from the tank to the metering pump.
Priming the fuel line
The Eberspacher D2 uses a very small quantity of fuel and as such each pulse of the pump only moves a very small quantity of fuel. It would therefore take a long time for the fuel to reach the heater using only the metering pump. Consequently, my next task was to prime the fuel line from the tank to the metering pump. I achieved this by connecting a handheld syphon pump to the end of the fuel line and simply pumped until fuel reached the end of the fuel line. Finally I removed the syphon pump and connected the fuel line to the metering pump.
Stage 3 – Final installation
Exhaust and air intake
Now that the heater was connected to the fuel supply, I was able to attach the air intake and exhaust pipes. These were simply push fit and then held in position with jubilee clips. Once I was happy that they were firmly attached, I pushed them through the floor and secured the heater in place using six stainless steel screws.
Ducting
As my heater was second hand, it did not come with any ducting. I found that the manufacturer recommended ducting was very expensive, and so instead opted for a 10m length of aluminum foil ducting. At the time of installing the heater, I had not completed building all of the cupboards. Consequently, I was unable to complete the full installation of the ducting. As an interim, I cut a short length of ducting which I connected to the heater using a jubilee clip and routed into the living space.
Electrics
The final stage in my installation was to install the electrics. This was relatively simple as the Eberspacher D2 came with a pre assembled loom. Consequently, the LCD controller, fuel pump and heater all simply plugged into the loom with multipin connectors.
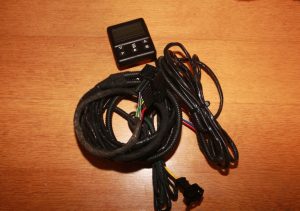
I first positioned the LCD display next to my switch panel and ran the cable through the back of a cupboard.
In order to run the cable to the metering pump, it needed to pass through the floor. I was reluctant to drill a large hole for the connector to pass through and so decided to drill a smaller hole. I then cut the cable, passed it through the hole and then rejoined the cable using a soldering iron and heat shrink cable sleeving. This was a simple enough task.
The Eberspacher D2 Diesel heater has three power connections. An earth connection that I routed to a local earth point, as well as two positive supplies, each with an inline fuse. One of these is a high current supply for operating the glowplug, fan, etc and the other is for the control circuit. I therefore ran both of these back to my battery and connected to to the positive terminal.
Stage 4 – Testing
Finally, it was time to test my installation! I switched on the heater using the LCD controller and soon I could hear the pump clicking. As expected, the heater failed to ignite on the first attempt as it takes time for the fuel to travel from the metering pump to the heater. Consequently, I restarted again and this time it started correctly! Success!
Once I was happy that the heater was working, I shut it down and let it cool. It is important not to simply pull the fuse out as these heaters must be allowed to run their shutdown procedure to prevent permanent damage.
Finally I had heating!
For further information on my Motorhome conversion, please click here!
Website designed & maintained by Mark Richards Education.
Copyright. © 2020 Van and boat. All rights reserved.