Introduction – Lining the walls of a self build Motorhome based on a Citroen Relay, Peugeot Boxer or Fiat Ducato
In the previous section, I explained how I prepared the van for conversion and how I fitted the floor. Now that I had a sturdy and well insulated floor, it was time to complete the Motorhome Lining in the living accommodation.
Waterproof membrane.
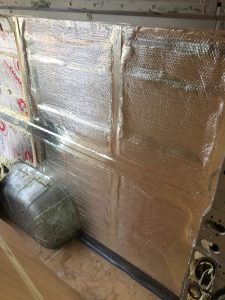
My research showed that a common problem with motor homes converted from panel vans is rusting side panels and sills. This is mostly caused by condensation. To overcome this, I decided to install a layer of foil backed bubble wrap to the interior walls. Furthermore, it would add an extra level of insulation. Each 10m long 500mm wide roll cost £12 at Wickes. I found that spray contact adhesive from Screwfix at £2.50 per can worked a treat. To cut I simply used kitchen scissors.
The bubble wrap made a noticeable difference to noise levels as well as warmth and so, in my opinion is definitely worth doing.
Insulation board
Once I completed the bubble wrap, I cut more insulation board and stuck this to the bubble wrap. Again, spray contact adhesive worked well. I let the adhesive dry for a few hours before using the spray foam to seal all of the gaps. I also used the excess dried foam from the floor to pack out the box sections to reduce the number of cans required to complete the job.

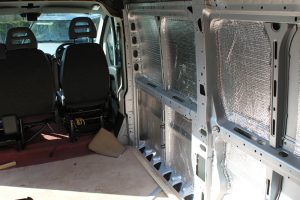
Timber framework
Once a single layer of insulation board had been installed over the bubble wrap my next job was to install the timber frame to the steel work in order to support the ply lining. This was a slow process as I wanted the sides to be as near vertical as possible to ensure that the caravan interior would fit correctly. Each piece of pine had to be shaped, however I would later appreciate the efforts at this time. It also involved cutting some of the insulation board and foam installed in the previous stage. Indeed, in retrospect if I were to repeat this project, I would install the framework before installing the insulation.
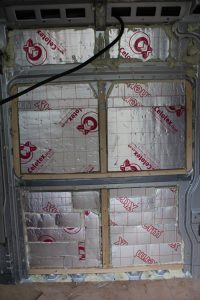
More insulation board and foil backed bubble wrap!
Once the timber frame had been installed, I added extra layers of insulation board again using the spray contact adhesive. This aspect of the project was somewhat time consuming as I had to reduce the thickness of the final layer of insulation board to ensure that its surface was around 3mm below that of the pine frame to allow for a second layer of foil bubble wrap over the top. The second foil layer was intended to act as a vapour barrier between the ply and the timber frame. To ensure this was as impervious as possible, each joint was sealed with foil tape. The flush finish of the insulation also ensured that should any adhesive fail, the loose insulation would not move and squeak.
Ply lining.
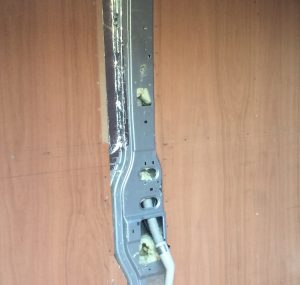
The timber framing and insulation took far longer than I had hoped, however I feel that it was worth the pain as I remain confident that the structure will last well into the future. Once the lower panels were complete I began shaping the 9mm ply to be installed over the top. I began by rough cutting the panels to enable me to move them within the van, I then offered them up in position and marked the corners directly onto the board. In order to ensure that the van was as wide as possible, I cut a horizontal channel using a plunge saw and chisel around the strengthening box section as shown below.
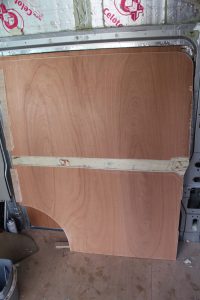
Stock sizes of ply, i.e. 8×4 sheets were smaller in size than the original vans boarding. Consequently, I found it necessary to have a vertical join on each panel. The lap joint can also be seen in the above photo where I have glued and screwed an off-cut in position. I had to cut back the insulation locally to enable this to fit and again ensured that the wall was sealed with more foil tape! Finally the panel was screwed into place using 8×1 ¼ screws.
Self Build Motorhome: Lining the roof.
Once all of the lower walls were lined, I moved onto lining the roof. This was similar to the process of lining the side walls. However, the construction of a wooden frame was unnecessary as there were enough structural members to give a satisfactory fixing for the boards.
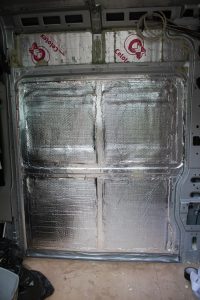
Insulation board and foil backed bubble wrap.
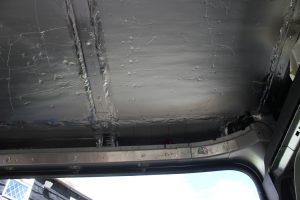
Once again, I lined the steel panels with foil backed bubble wrap before sticking the insulation board in place using spray contact adhesive. It was important that the insulation was the same thickness as the reinforcement members. This would prevent it rattling above the ceiling as a result of the contact adhesive failing. I felt this was actually highly likely due to potentially high temperatures on the roof. In order to achieve this, I packed out areas with further bubble wrap and strips of insulation board. Finally, I used foil backed adhesive tape to seal all joints and damaged areas of the insulation board.
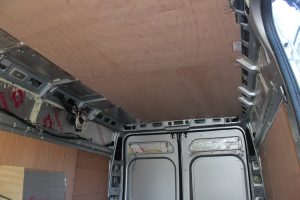
Ply lining.
The final stage was to cut the 9mm ply to size and screw up as before. To make this a little easier, I used ‘Acro props’ to hold it in place until all screws were fitted. The following photos show the insulating and lining of the roof.

To keep up-to-date with my progress, please subscribe to my mailing list!
Copyright. © 2020 Van and boat. All rights reserved.